Added this beautiful rustic LOVE sign to the flower bed infront of our patio. It just adds charm and character.
We baught our new home in September 2012 and we are starting to settle into the house and the garden slowly, but surely. Thank you to all our family and friends that have been helping us and supporting us. We are really enjoying our new space and love sharing it with you here.
Labels
- home (33)
- garden (32)
- going green (10)
- patio (9)
- kitchen (5)
- Our Bedroom (4)
- baby room (4)
- forest (4)
- bathrooms (3)
- entrance (3)
- living room (3)
- photography studio (3)
- Pink Passion (2)
- driveway (2)
- pool (2)
- loft (1)
home picture
Home SWEET Home
Showing posts with label patio. Show all posts
Wednesday, December 19, 2012
New addition to the patio
This is our latest addition to our patio plants. I call this one "Klokkelaan". I think it's real name is Fucushia. Just beautiful!!!! This is the small version, there are bigger specie that grows into a large bush.
Friday, November 30, 2012
BEFORE AND AFTER: Garden around the patio area
It is time for some updates on the garden. The garden all the way around is truly becoming so beautiful! The summer rain and weather is helping for sure. No more brown winter lawn!
Below: The garden planted on either side of the steps leading up to the patio. First photos taken 3 months ago as soon as we planted. Just look at it now!!!!!
This garden was specially planted for our bearded dragons, it is filled with their veggies, salads and herbs and a few flowers here and there. The white daisies will be blooming soon.
Below: Pineapple sage in a pot. I cut this one down every winter and let it come back to life in the summer. It can grow into a very large bush and makes beautiful red flowers that the humming birds love!
Below: A beautiful pink creeper rose - finally we have roses!!!
Below: A plant we found at the back of the house when we moved it. It was just about dead , really just a stubble. My husband gave it water straight away and whala, 3 months later we have a beautiful addition to our patio plants.
Below: In addition to the lettuce down in the vegetable portager garden, we decided to plant some lettuce in a container on the patio.

Below: We have 3 pots with strawberries in. Just adding photo's of the one showing from both sides. See the little creepers going down!!! We will leave it to kreep and see where it goes.
Below: The garden outside the bay window with white and purple irises, lavendar and some other flowery bushes, not sure what they are called.
Below: The garden planted on either side of the steps leading up to the patio. First photos taken 3 months ago as soon as we planted. Just look at it now!!!!!
This garden was specially planted for our bearded dragons, it is filled with their veggies, salads and herbs and a few flowers here and there. The white daisies will be blooming soon.
Below: Pineapple sage in a pot. I cut this one down every winter and let it come back to life in the summer. It can grow into a very large bush and makes beautiful red flowers that the humming birds love!
Below: A beautiful pink creeper rose - finally we have roses!!!
Below: A plant we found at the back of the house when we moved it. It was just about dead , really just a stubble. My husband gave it water straight away and whala, 3 months later we have a beautiful addition to our patio plants.
Below: In addition to the lettuce down in the vegetable portager garden, we decided to plant some lettuce in a container on the patio.
Below: We have 3 pots with strawberries in. Just adding photo's of the one showing from both sides. See the little creepers going down!!! We will leave it to kreep and see where it goes.
Tuesday, October 2, 2012
GARDEN: Portager Phase 2 - Let the games begin
Phase 2 has been tiring and is not even nearly finished, but here's what we did get done in one day!
Below: Went of to the Nursery on Sunday and got some square steppings tones and plants for the portager.
Below: The plants packed out in the shade.
Below: Start of the resting area / portager patio!
Below: Just some details on the stones. 4 squares making one big square in the same patterns. Example below. Surrounded by 6 square other with various designs, not one of the 6 are the same.
Below: Deciding what goes where opened up a can of worms!!! Clearly this garden is muuuuccchhh bigger than what I thought, look, not even half the beds will be filled. From this photo you can also see the stones we started laying in the pathways leading in and down to the resting area.
Below: Revealing the secrets. We got these take away beer mugs at an expo on Saturday and we collected them. No, we did not drink that much beer!!!! They will work great in our eco-circles, which is the eco friendly garden style we decided on for this portager. More on this eco-circles to be revealed in good time.
Below: The concept of the eco-circle is to have one large plastic plant container in the centre, planted in the circular bed. Or 2L coke bottle with the top cut off. Drill holes and plant it. I have planted 3 of the beer cups after we drilled little holes in them. Just to see as a test how this will work. I may make some of the other beds slightly different. When you water, you only fill the container(s) in the middle as appose to spraying water all over the plants.
Below: you can clearly see the 3 circles where I added compost to the soil. I counted about 15 circles in my garden. HEEEELLLPPPP!!!!! What was I thinking.

Below: Finally - one bed done!!! Butter lettuce and parsley mixed in my first eco-circle! And my only eco-circle for now. I think it will take a while to have the entire garden planted, but THIS is part of the journey, seeing it grow, and appreciating every step for what it is and for what it teaches us about ourselves and life in this world as we know it.

GARDEN: Portager Phase 1 - Humble Beginnings
Humble Beginnings Indeed. . .
Just a few shots to give you an idea what I mission it has been just to complete PHASE 1 - PREPARING THE SPACE.
Below: 3 photos from original state to final state of the portager before planting and layout can start.
Below: The area directly next to the portager will be converted into 2 parking spaces. So what we did here was to transplant the lavendar bushes further back behind and next to the small tree. We then transplanted some of the grass to the empty spot where the lavender bushes were before. Opening up more space for the parking area.
Thursday, August 23, 2012
IDEAS: PATIO PROTECTION
Now when I talk about patio protection, I am referring to installations that will assist with protecting your patio furniture and accessories as well as you against the elements of nature. You can have a lovely patio, with beautiful furniture, but if it is a windy day no one will enjoy the relaxation it should offer, if it rains water will get blown in and over time prematurely age your furniture and ruin your accessories which you will struggle to keep clean.
So let’s take a look at all the options – bearing in mind these options will vary dramatically in purchase price, durability and installation costs and difficulty.
1. Frameless stackable doors & Curtains:
These doors are expensive!!! Between R 3000 – R 6000 per running meter. These will be custom sized and installation will be time consuming and costly and will need to be done by the professionals. You also get the ones that have frames, approximately the same price. The frameless ones are nice as they don’t make the area feel smaller. These doors are very secure and durable; they keep out rain and wind and still let the sunshine in. Outdoor curtains will compliment this set-up, they look beautiful and add to the décor, but they also serve as shade if there is too much sun coming in you can close the curtains whether the stackable doors are closed or open.
2. Outdoor canvas blinds:
These are a much cheaper option, but being canvas and custom made it will still be rather expensive, but I think the installation will be easier and quicker. They often has a “window” in with clear plastic which still protects the patio from the outside elements when down, but on the sides rain and dust can still come in. They get hooks at the bottom to keep them in place, but are not secured on the sides. Once unhooked one can roll them right up and open up the space. Keeping these clean, I am sure is more difficult than cleaning glass. But they will offer good protection form the weather. One can still add the outdoor curtains so that when you roll the binds up completely you can open and close the curtains for protection from sun.
3. Roll up ‘doors’:
I don’t know what the costs are of these, I suppose they have to be custom made to fit as per the first two options and I can imagine they must be the price of a garage door. Not the prettiest of options, but secure and definitely will keep the patio clean and protected. Again, curtains can still be added to pretty up the space and for shade from the sun. And when in use they can be rolled up, but I really do not like the look. It is too Industrial.
Above: Clear patio blinds. These are not glass!!! Look closely. I think they will be difficult to clean and maintain.
Above: The canvas type patio blind with the window.
Above: Stunning "frameless" stackable doors. Very secure, easy to keep clean and maintain.
Above: Roll up outdoor blinds. Not a pretty site when down, but keeps the patio clean!
Above: Just love these curtains and this whole patio. It is just lovely!
Above: Just too industrial. I don't like it.
Above: I love this space. Stackable doors open up to the patio connecting the interior of the home with the patio. Curtaining used to cover from exessive sun, I am sure it will be pretty when open. Behind that curtaining there may be another set of stackable doors for all we know... this space is inviting and looks just so relaxing.
Wednesday, August 22, 2012
IDEAS: PATIO
Just have a look at these pictures. Although our patio design is not in line with these pictures, these pictures have so many elements in them that one can use in any décor on patios. Colour, furniture and accessories, curtains, shelter from wind and rain, etc.
I feel so inspired!!!
Above: Lovely entertainment area next to the pool with blue as the accent colour.
Above: I love the "reeds roof" covering. Built in concrete couches with puffy pillows.
Above: A small area in the garden is transformed into a magical space with lose pebbles laid out, a crisp white canopy for shade and a few furniture pieces.
Above: A small patio transformed into a idallic space with bursts of colour.
Above: How stunning is this pink??? I just love it!!! Again, reeds as covering from the sun during the hottest time of day.
Above: I love this couch, flooring and carpet. Also love the lanterns!!! It just adds that something special.
Above: Another colour scheme with screens installed at the back to offer privacy.
Above: Not a very big patio, but beautifully decorated and perfectly functional.
Above: Just love the colours and furniture. Very arty!
Above: Another space created with small bamboo screen giving privacy and protection, thin cotton canopy in colour for shade, seating and a small dining space!
Above: WOW, Just love this. It is so rich, and yet relaxed, just a beautiful space! The curtains offer protection from sun, so needed in our South African summers, but can be opened and closed as desired.
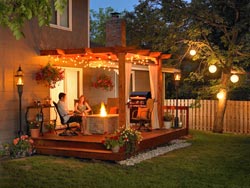
Aboev: Toooo cute!!! And just love the string of small oriental lights from pillar to pillar.
Above: Perfectly beautiful for a small family to relax or a romantic dinner.
Above: Colour, colour, colour. It really does play such a big role. Look at the woven blue covering just softening up the space above and tying into the antique blue chairs and the dashes of blue on the door and other accessories.
Above: Corner couch!!! Definately works with a lot of these patios. Lovely splash of colour. Definately suitable for summer.
Above: A antique french feel in this corner of the patio. Wish I could see what the other side looks like. I love this. It is tooooo darling!
Subscribe to:
Posts (Atom)